Robot Test Kitchen’s 5 Barrier-Busting Programs!

Programs

In correlation with our Illinois Library Association Presentation “We Don’t Need No Stinkin’ Robots,” Robot Kitchen is proud to present our five favorite programs that will help you bust through the most commonly-encountered barriers to technology: time, budget, skills, interest, and support. Keep an eye out for other recommended projects and resources or share your own at #StinkinRobots.

  1. Stop-Motion Animation: Stop-Motion videos can be made in several different ways depending on the technology and materials you have available. LEGO blocks and minifigures and always a favorite, but you can also use Play-Doh, Post-it notes, or small toys. This tutorial shows how to to make a video by capturing images with a digital camera or webcam and then edit them with Windows Movie Maker Live (a free download). There are also numerous apps available for Apple and Android products, depending on what you have at the library or what your patrons can bring in. If you have teen volunteers, assisting with Stop-Motion programs is a perfect fit as they can provide hands-on help with the editing as well as keep kids on track through the design and filming process.
  2. Take It Apart: The upside of technology going out of style every few years, is that most libraries have old computers and other outdated technology hanging around.  Goodwill and other thrift stores sell things like remote controls, dvd players, and iPod speakers.

Now I haven’t done this program yet, it’s coming in January.  But I wanted to share what some of my peers have done in other libraries.  J learned how to take apart computers by watching YouTube videos.  R. had a great turn out and took pictures.   H recommends getting lots of screwdrivers and paint scrapers (for pulling things apart).  Participants loved the idea of just taking things apart.  Some libraries had IT guys on hand to act as resources. That’s definitely what we’ll be doing; the IT guys in my library are pretty much going to run the show.

Everyone recommends that you watch the sharp bits — the insides of computers are very sharp (one library recommends having a supply of band-aids on hand).  This has turned into a road-block for my program.  The concerns that children could get hurt have been raised, so we’re developing ways to work around that.  One idea is that we have three tables with library staff taking the sharp bits out of the computer and letting kids explore the things that have been removed. I can’t wait for the program.  The possibilities of this barrier busting program are really exciting.  I’ll blog about it once it’s complete.  SH

3. Coding Club: Believe it or not, you can begin a coding club at your library with very little prep time and without knowing much at all about coding. Several of us here at Robot Test Kitchen have had success with the approach of learning alongside our patrons. In terms of technology, you can use your library’s desktop or tablet computers, or even take over the adult computer lab for an hour. Our favorite FREE online resources include  Code.org, Kahn Academy, or Code Academy (which has a free After school Programmingtoolkit).

4. Cardboard Challenge: The Cardboard Challenge is an annual event thought up by the Imagination Foundation. It is a simple program any library can present – no technology required. All you need is a supply of cardboard, some various craft supplies and a place for kid’s to create. The important thing to remember with this program is to not have a specific thing a kid needs to make, the point is to let the kids imagine on their own what they can make with the cardboard. Let go and let the kids tap into their own creativity. It can be a minimally staffed program; it is helpful to have at least one adult there with a utility knife to help cut out doors, windows, or whatever kids can dream up.

5. Squishy Circuits: Who doesn’t like playing with play dough? This is an interactive, inexpensive, approachable technology activity that has worked with kids as young as preschool and as old as junior high – and is fun for adult participants too. With two different types of home made dough, a few dollars in electronic parts like LEDs and wires, and a battery pack or 6V lantern battery, you have everything you need. Squishy circuits really brings play into the equation in a big way. It’s a material that people are not intimidated by at all, so it’s more conducive to relaxed playful interaction. Participants bring their positive experiences playing with dough to squishy circuits as well, which is helpful when they are trying something new and different. Try it with young kids and see their eyes light up in surprise; try it with tweens and teens and see the kid in them come to life and engage with an old friend in a whole new way.

The Tickle App Made Me Fall in Love with Sphero All over Again

Programs, Sphero, STEAM stuff

A question that has come up a few times about some of our robots is, “Does this have any educational use, or is it just a toy?” I’d like to always say that it’s educational, and emphasize how kids learn through exploration and play. But I do see the other side, especially when it comes to Sphero. Sphero can be used as the amazing round robot it is with apps like Draw ‘N Drive and MacroLab, or it can be played with as an RC toy. When I’m showing kids Sphero for the first time, I start with the basic navigation to get them used to controlling it, and it’s all too easy to stop there and just roll it around the room.

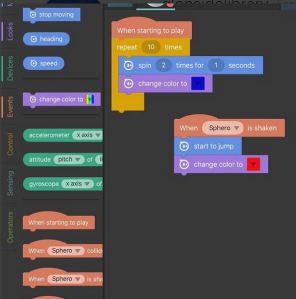
tickleFrom the moment I tried out the Tickle App, I was excited by how it taps into Sphero’s potential. It has a visual interface that resembles Scratch, which many kids in my community are familiar with from school, the library’s coding club, or their own pursuits. It’s easy to get started — just drag and drop commands into place. It was so much fun I may have been a bit of a menace at first because of how fun the commands are — “Just pick it up and shake it. See what happens! What what it does when I drive it into the wall!” We’ve been pretty enthusiastic about Sphero ever since we got our hands on them, and the fact that after all this time we can discover a new app to control the basic hardware just reinforces that this is a good robot to have around.

Losing your 3D printer (and choosing a new one): A guest post

3D Printing, Guest post, Programs

My colleague, Adult Services Librarian Jim Barton, has shared some of his thoughts on our experience with 3D printers in the library. 3D printing is something we’ve had a few questions about here at Robot Test Kitchen, so I’ll be writing more about that in the coming weeks. 

Our library decided, a few years back, that owning a 3D printer would open a world of possible programs, and encourage the growth of a local maker community. Cool, right? So one day, out of nowhere, a MakerBot replicator shows up in the workroom.  Instructions to staff? “Play with it.”

So I, and a few others decided to do just that. I introduced myself to the wonderful world of hobbyist 3D design with free tools like TinkerCAD, Google Sketchup, AutoDesk products, and more. I delved into the MakerBot: learning to calibrate the build plate; importing .stl models into the Replicator G software; learning to edit the native Gcode in Replicator G to modify printing parameters; tinkering with such settings as layer height, print speed, and infill to find the optimum balance of successful printing and print speed.

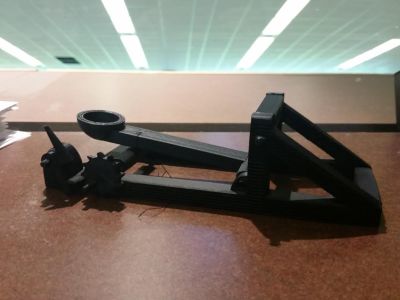
I offered some successful programs. My proudest achievement was designing a multi-part working catapult in TinkerCAD and successfully printing it.catapult

And then one day I started a new print and…nothing but big blobs of gooey plastic. I tried again: same result. Coworkers and I researched the problem and tried solutions, to no avail. We discovered that support for 3D printers is very much a hit or miss proposition. Our 3D printing programs came to a screeching halt.

And then, one day a new 3D printer from Cubify showed up in the workroom: a sleek gray plastic number that we named Batgirl and lavished attention upon.

So I sat down to get myself acquainted with Batgirl (okay, I just like the sound of that). How would this compare to the old MakerBot Replicator?

Well, first of all, the Cube is a lot prettier than the old wood-enclosed Replicator, with its filament spools hanging off the back of the machine. The PLA filament for the Cube comes in see-through plastic cartridges that just click into the sides of the printer. Shiny!

And the build plate! On the Replicator you had to manually level the build plate and then cover it with shiny orange kapton tape (for ABS printing) or blue painters tape (for PLA). But the Cube; why you just press auto align and level and Presto! Of course the first time we did that, it didn’t actually align so well and the print heads gouged the heck out of the build plate and we had to calibrate manually anyway but, hey, whatever. At least with PLA printing, there’s no taping of the build plate, just a glue stick that you run over the surface a few times. And the plate is attached magnetically and is easily removed and washable. Score!

But what about printing? Well, I grabbed an .stl file that we’d printed before and…what? First, how was I supposed to get the file to the printer? You can discover the printer via WiFi or on your network, but ours isn’t actually on the network. You can print from the cloud, but that seems to cost. I just wanted to print a freely created model on a printer that we own, locally. Well, the easiest way to do that is to put your file on a USB drive and plug it in to the printer.

I tried that and discovered that the Cube doesn’t read .STL files. What does it read? .cube3 files of course. Proprietary format: not crazy about that but let’s give it a try. Okay, let me convert my file to Cube format. How do I do that? Let me check the online help. Hmm, nothing. We looked and looked and could not find a simple instruction for how to do the most basic task for this printer.

Eventually I discovered that we needed to download Cubify software. I found the right version for our printer, installed it, and…now how do we make this .cube3 file? I and my coworkers looked in the Cubify application, we looked on the Cubify website, we looked in forums, we looked on YouTube. Nothing. Eventually we found the key to print preparation in the Cubify app and—magic—printing! One color printing, because the cool neon green print cartridge isn’t working but, you know, printing! We’re back in the 3D business!

So what have I learned in all of this? Be careful what you wish for. 3D printing is cool and people are really excited about it, but printers can be a real pain. The old gen Replicator felt like a prototype, like you were really getting into the guts of the machine and learning things. The Cube 3D is sleek and modern looking, like a fancy new toaster. At the end of the day, though, it’s just as finicky as our old Replicator and, unlike the Replicator, you can’t get under the hood as easily. I can’t edit the Gcode, the Cubify application seems restrictive and not intuitive. The fancy plastic print cartridges seem like wasteful overkill. But it’s printing as I write this, and I’ve got a lot more to learn, and at least we’re back in business.