Ten Dollar Tuesday: Take Flight

Programs, Ten Dollar Tuesdays

Learning about the forces of flight is cheap, easy, and fun (really!).

Supplies: Paper, masking tape, paper clips, scissors

1. Discuss the forces of flight: Lift, Weight, Thrust, and Drag. You’ll just want to provide a very basic understanding of these concepts.

2. Discuss how the forces of flight work on paper airplanes, such as how the large or heavy paper stock will have more weight, and how careful folding can result in less drag.

3. Provide books and templates to make a variety of paper airplanes, and use masking tape to mark a practice range to test them. Paper clips and tape can be used to experiment the effect of adding weight to different parts of the plane.

4. At the end of the program, have the participants compete for the farthest flight. I’ll give them three throws for their best-flying plane with the opportunity to make adjustments to the plane between throws.

Coding Club: It’s Not Just About Coding

Programs

We had our first coding club for 4th-8th graders a couple weeks ago, and I’m glad to say it was a success. Here are a few things that helped it go smoothly:

  • Because my coding experience is limited and my workplace encourages cross-departmental collaboration, I co-planned it with a librarian from adult services who has more of an IT background.
  • At the beginning of the program, I told the participants that it was coding club, not coding class, and that they were encouraged to contribute and teach others.
  • We had a plan for what we would demonstrate, but had plenty of flexibility within this plan depending on our attendees’ interests.

While we were demonstrating a game created with Scratch, a 5th grader asked if he could show a game he had made. I was apprehensive for a moment because his behavior while in the library is frequently disruptive, but he calmly and capably stood in front of the room and demonstrated the game he had made, described how he had built it, and showed how it could be modified.

It was awesome. After so many interactions in the library where we had to remind him about his behavior, I saw this boy absolutely shine. This is what makes it worth stepping out of our comfort zone. To some extent the programs we do are not about coding, or robotics, or basket-weaving. It’s about us connecting with the community, and giving community members of all ages a chance to learn something new and share what they know.

Ten Dollar Tuesdays: Strawberry DNA Extraction

Programs, Ten Dollar Tuesdays

In the Robot Test Kitchen, we talk about five main barriers that we typically face in conducting technology programming in our libraries: time, budget, skill, interest, and support. It’s our belief that most of these are not impossible barriers, but sometimes it’s hard to see how. Especially when things like your time and budget are already stretched paper thin.

On Tuesdays, we’re tackling the budget question with programs you can run at your library for under $10. We’re also addressing the interest and support questions by asking you to share your inexpensive STEM programs in the comments, and to let us know what kinds of feedback you’ve gotten when you’ve tried these or similar programs in your buildings! This week: Strawberry DNA Extraction

Cost: About $5 for strawberries and a bottle of rubbing alcohol; the other items are usually available around your home or workplace (and only needed in very small quantities)

Age Range: elementary-middle school

Difficulty: Easy to set up; explaining the procedure will take some staff preparation

Here’s what you’ll need:

strawberry dna


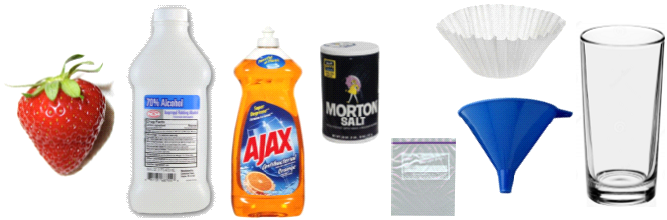
1. The day before, put the bottle of rubbing alcohol in the freezer and keep it icy cold right up until you’re ready to use it.

2. Remove the stems from 2-3 strawberries, put them in a Ziploc bag and have the kids mash them up.

3. Create an “extraction buffer” with 1 cup water, 3/4 tsp. salt, and 3/4 tsp. dish soap or shampoo; add this solution to the mashed strawberry, and mash the bag well to mix it well.

4. Place the funnel over a glass, and a coffee filter into the funnel, and pour the mixture from the baggie into it; use a spoon to press as much through the filter as possible.

5. Carefully drop or pour the cold rubbing alcohol down the side of the glass. The mixture will separate into layers; the strawberry’s DNA is the white mucous-like substance on top. You can remove it with a craft stick or coffee stirrer to examine it more closely.

This activity works well in a program with a discussion about DNA in general, solubility of liquids, forensic investigations, or even gardening.

I learned about the procedure from Cool Forensic Tools by Esther Beck, 2009.